Mystical Fine Art Prints
by
Edward Maesen
Mount Shasta, CA, USA.

This section of my website features digital artistic renditions of some of my photographs, together with entirely digital creations, organized in themed catalogs. Gallery-quality prints of any of these are available. Most prints are made available as a signed and numbered limited edition of 36 or 18, so you can be assured of exclusivity.
Each art work is printed by me personally and signed with pencil within the margin of the print; there's sufficient margin to allow for easy framing. All art works are printed with high-quality archival UltraChrome K3 Pigment inks on heavy acid-free Velvet Fine Art matte textured paper 260g/m2.
While browsing the art catalogs, you can mark images as "favorite". Information about those images will appear here so you can copy-and-paste that in an email. You may also email me the title or web page URL of each art work that you are interested in.
An image can be toggled as a "favorite" by clicking icon , it will expand with a green border if selected. Alternatively, you can press the [f] key on your keyboard.
The selected favorites are only stored in your browser's memory: you can clear your selections simply by closing your browser tab.
By clicking on any of the images within an art catalog you enter a page where you can easily navigate through all images within that catalog. On this page, the onscreen arrows and can be used to cycle through images within that catalog. Alternatively, you can navigate using your keyboard by pressing the [left arrow] or [right arrow] keys respectively.
The breadcrumb trail at the top of the page allows to quickly jump up one or two levels, or go back to the home page.
By clicking on any of the images within an art catalog you enter a page where you can easily navigate through all images within that catalog. If your browser supports it, this page makes an option for a full screen slide show available, indicated by icon .
The slide show can be paused, and the direction can be changed with the buttons . Alternatively, you can press the [spacebar] on your keyboard to pause or resume the slideshow. Pressing the [up arrow] key switches direction to backwards, while pressing the [down arrow] key switches direction to forwards.
The speed of the slide show (i.e. how many seconds each image is displayed) can be changed with the buttons (in order of slowest to fastest). Alternatively, you can press the [shift]+[<] keys on your keyboard to go slower, or [shift]+[>] to go faster.
After I had taken photos for many years, I felt an urge to create something more "artistic" with them, something beyond a mere capture of a moment in time. I started to merge photos from nature with photos from people, where the human faces or figures are sometimes only apparent on close inspection, as a secondary layer in the image. I created 24 of those images and called the series "Spirit of Nature".
Additionally, I created a series of 27 digital designs based on crop circle geometry and called that series "Communiqué Galactique". I also made special print versions from a selection of my photographs.
The first print from the Spirit of Nature series is the only one that has an animal face in the background layer. A dog's face can be seen between the tops of the trees. It's a picture of my beloved little Bichon Frisee Louis who died at this mountain (Mt Shasta) and who is the reason that I moved up here: I had a profound firsthand spiritual experience that there is more than just this physical life. In this art series my aim is to show the merging of dimensions, the lifting of the veil.
To read more about my editing and printing workflow and the tools thay I use, please continue here….
I edit the RAW files of my photographs with Capture One. For the digital manipulation of my images I use Photoshop Elements. For digital artists like me there is no need to buy the full-blown Photoshop. PS Elements contains all the essentials. And a plethora of hidden features can be unlocked with a plugin named Elements+. The benefit of PS Elements is also that it can be downloaded so there is no dependency on the "cloud". In addition to the blending of images to create the final result I also apply several digital filters to produce a painterly effect.
I've had a professional printer (Epson Pro 3880) with archival UltraChrome inks for a few years and occasionally made a print of my photography. It was always a pleasure to have something physical in my hands to look at instead of viewing my photographs on a computer screen. When I first got the idea of my Spirit of Nature series with a more artistic rendition of my photographs, I decided to also design them specifically to be printed. I bought several archival quality sample papers and experimented which would suit best for this series. I choose a Velvet Fine Art 100% cotton 260 g/m² textured matte paper (17″ × 22″). It is a beautiful paper that enhances and compliments the images in this series and it shows clarity and detail on close inspection.
Once I had decided to design this series do be printed, I also thought about making them available for sale. For that there are essentially two options: as an open edition, in which there is no limit to the amount of copies to be printed, or as a limited edition, in which there is a maximum number of available copies. The latter ensures exclusivity and for that reason I decided to go with that option. Some artists offer a limited edition that is signed and numbered, and in addition an open edition that is unsigned and typically on lower quality paper. Since I print all my art work myself I only offer a limited edition print. Each print is individually prepared and contains the title, edition number and information about the paper printed in the margin. Once printed I sign each in the margin with pencil.
I keep track of the status of each edition with a simple spreadsheet (using OpenOffice): it has a row for each image, and a column for each edition number. I have a series of abbreviations that I can place in each cell to indicate whether a given edition number of a given image was offered for sale anywhere, or whether it has been ordered, printed or delivered.
As may be apparent from my Communiqué Galactique art series I'm interested in numbers. In different ways, the numbers 3, 6 and 9 have a special meaning. For that reason I chose the number of prints in these limited edition series to be 36 (3+6=9).
Since I had decided to print and ship my fine art prints from home, I needed to figure out how best to pack them. One benefit of my choice of the Velvet Fine Art paper was that, though it being a heavy weight paper, it is still bendable enough that it can be rolled into a tube for shipping.
It took me quite a while to figure out how best to package the art work but I eventually settled on the following:
I insert the print into a protective polypropylene storage bag, wrap that around a 4" diameter cardboard tube, wrap those in bubble wrap, and place that inside a 6" diameter cardboard tube (24" long).
My art is available online through my Etsy store, on SaatchiArt.com and on ArtPal.com, or by custom request.
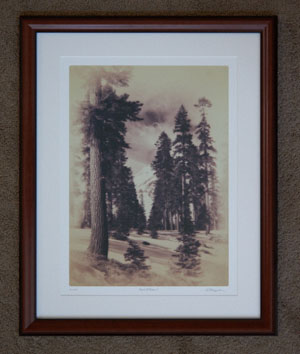
In preparation for an art exposition I have framed a selection of my prints.
Over the years I have tried a few online frame suppliers. I have found that the cheapest ones do not provide an acceptable quality. I've dealt with rough and mis-cut acrylics, sloppy packaging, long delivery times and poorly assembled frames.
Currently I'm using a supplier that provides great quality and that I am really happy with: AmericanFrame.com. Not the cheapest but still less than half of what I would pay in a local frame shop.
When I started framing my own work, it took me a while to figure out what tools and supplies I needed. So this paragraph lists an overview of my framing tools.
Lineco Linen Hinging Tape - cut two 1-inch pieces to create a hinge on the top side of the frame between the mounting board and the mat.
Lineco Mounting Corners - these are small plastic corner "pouches" that stick to the mounting board. The art work glides in them. I only put corners at the bottom of the art, so that the paper has as little restriction as possible. The benefit of using these corners is that no tape or glue touches the art paper. The art can be simply lifted out if need be.
DaVincy 2487 anti-static brush - soft brush to wipe dust off the glass/acrylic and the art work.
Logan Picture Framing Fitting Tool F400-1 - tool to press metal insert into the back of the frame to hold the mounting board in place.
Logan F11 flexible inserts - flexible inserts to be used by the Fitting Tool. I use the flexible inserts because they can be bend to allow pictures to be swapped if need be. For permanent applications, hard inserts can be used instead.
Scissors and a ruler complete the set of tools needed to frame art work.
And of course you need a frame, mounting board, mat board, and glass or acrylic. I use acrylic because of the weight benefits.